Bringing Depth to Flat Surfaces: A Practical Guide to the Papercut Layered Butterfly and Flowers Design
There is a distinct satisfaction in watching a flat sheet of paper transform into something that appears to breathe. The Papercut Layered Butterfly and Flowers design captures this magic by utilizing depth, shadow, and intricate layering to create a visual experience that changes depending on the angle of light and the viewer’s perspective. For creators, hobbyists, and small business owners, this isn’t just a pretty image; it is a versatile digital asset that bridges the gap between traditional craft and modern digital fabrication.
Whether you are looking to create a heartfelt gift, elevate your home decor, or produce sellable items for your Etsy shop, understanding how to leverage this specific layered design can save you hours of drafting time while ensuring professional-looking results. This guide explores the practical applications, technical considerations, and creative possibilities inherent in this cuttable file set.
Understanding the Mechanics of Layered Paper Art
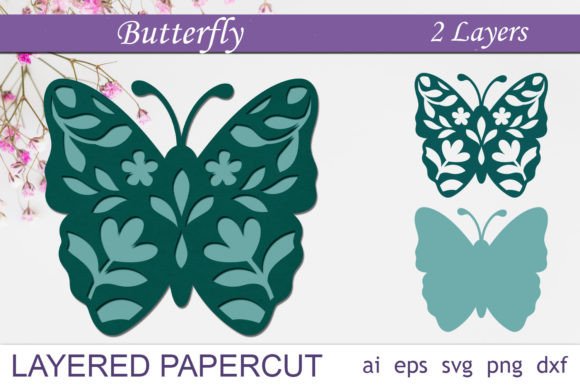
Before diving into projects, it helps to understand why this specific format works so well. Unlike a standard single-layer cutout, the Papercut Layered Butterfly and Flowers relies on stacking multiple pieces of cardstock or vinyl. Each layer casts a subtle shadow on the one beneath it, creating a three-dimensional effect without requiring complex folding or sculpting techniques.
The design typically includes organic shapes—delicate flower petals, swirling vines, and the symmetrical wings of a butterfly. When assembled, these elements draw the eye inward, creating a focal point that feels alive. This technique is particularly effective because it mimics the natural world, where depth and texture are paramount. By using pre-designed layers, you bypass the steep learning curve of calculating spacing and balance, allowing you to focus on material selection and assembly.
Real-World Applications for Creators and Hobbyists
The versatility of this design means it fits seamlessly into various aspects of daily life and creative business. Here is how different users are applying this resource in realistic scenarios.
Elevating Home Decor with Shadow Boxes
One of the most popular uses for this file is creating framed shadow boxes. A simple 8x8 inch frame can house the entire layered composition. By using varying shades of the same color—for example, progressing from deep navy to soft sky blue—you can enhance the perception of depth. This makes for stunning wall decoration in living rooms, nurseries, or entryways. It adds a touch of elegance without the permanence of paint or wallpaper, making it ideal for renters who want personalized decor.
Handmade Greeting Cards That Stand Out
If you enjoy card making, this design offers a premium feel that mass-produced cards lack. By cutting only the top two or three layers and adhering them with foam tape, you create a pop-up effect that surprises the recipient. Imagine opening a birthday card to find a delicate butterfly seemingly emerging from a bed of flowers. It transforms a simple gesture into a memorable keepsake. This approach is perfect for anniversaries, Mother’s Day, or sympathy cards where a tactile element conveys extra care.
Commercial Products for Small Businesses
For entrepreneurs selling on platforms like Etsy or at local craft fairs, time is money. Using ready-to-cut files like the Papercut Layered Butterfly and Flowers allows for rapid prototyping and production. You can create:
- Wedding Invitations: Use the floral elements as intricate overlays on invitation suites.
- Gift Toppers: Cut smaller versions from metallic cardstock to adorn high-end packaging.
- Wall Decals: If using vinyl, the separated layers allow for precise application of multi-color designs on nursery walls or boutique interiors.
Technical Compatibility and File Formats
To get the best results, you must match the file format to your tool. The provided zip file is comprehensive, ensuring compatibility across the spectrum of cutting machines and software. However, knowing which file to use prevents frustration and wasted materials.
If you are using a Cricut or Silhouette, the SVG files are your best friend. The package includes both unified SVGs (all layers in one file) and separated SVGs. The separated files are crucial if you want to cut each layer from a different color of paper without manually ungrouping elements in your software. This saves significant setup time.
For users with Brother ScanNCut machines, the DXF files are optimized for their interface. Meanwhile, professional designers using Adobe Illustrator or CorelDRAW will appreciate the AI and EPS files. These vector formats are fully editable, meaning you can adjust anchor points, change colors, or resize the design infinitely without losing quality. This is essential if you need to scale the project up for a large wall installation or down for a jewelry pendant.
Laser cutter users, such as those with a Glowforge or other CNC lasers, should utilize the DXF or SVG files. Ensure your software interprets the lines correctly for cutting versus scoring. The transparent background PNGs are useful for digital mockups or if you are using print-and-cut features, though they are not vector-based and should not be scaled up significantly.
What to Consider Before You Start Cutting
While the digital file is ready to go, successful execution depends on your preparation. Here are practical considerations to ensure your project succeeds.
Material Selection Matters
The weight of your paper dictates the final look. Heavy cardstock (80-110 lb) provides rigidity and strong shadows, ideal for shadow boxes. Lighter paper (60-70 lb) is better for cards where bulk is a concern. Experiment with textured papers, such as linen or felt, to add another dimension of sensory appeal. Avoid glossy papers if you are using adhesive sprays, as they may not bond well.
Software Readiness
Prior to purchase, verify that your cutting machine’s software accepts AI, SVG, DXF, EPS, or PNG files. Most modern machines do, but older models may have limitations. If you are new to layered designs, start with the separated layer files. They simplify the workflow by allowing you to load one color at a time, reducing the risk of misalignment during the cutting process.
Patience in Assembly
The cutting is only half the battle. Assembly requires precision. Use tweezers to handle small details like the butterfly’s antennae or tiny flower centers. Apply adhesive sparingly; too much glue can warp thin paper and ruin the clean lines of the cut. Liquid glue offers more control than glue sticks for intricate layers, allowing you to position pieces before they set.
Maximizing Value Through Customization
Because all vector files are editable, you are not locked into the default design. You can change colors to match a specific brand palette for a corporate gift or adjust the size to fit a unique frame. This flexibility turns a single purchase into a limitless resource. For educators, this design can be used to teach symmetry, biology (butterfly life cycles), or geometry through hands-on art projects. Students can learn about layering and spatial awareness while creating something beautiful.
Ultimately, the Papercut Layered Butterfly and Flowers is more than a digital download; it is a toolkit for creativity. It respects your time by providing ready-to-cut precision while leaving enough room for your personal touch. Whether you are crafting a quiet evening project or building a product line, this design offers the structure and beauty needed to make your vision tangible.
Thank you so much for your purchase, and may your cutting be clean and your creations inspiring.